

How To Use Lansky Knife Sharpener
Let's talk nigh knife maintenance. In that location are a few things any pocketknife nut needs to have in their collection of knife maintenance items: a good set of Torx bits and a commuter (I recommend Wiha), some appropriate pivot oil (I often use three-in-1, feel gratuitous to throw stones), medium-yield Loctite, and of course – a sharpener. Yous tin't buy that $250 ZT and and then attempt to sharpen information technology on the bottom of a coffee mug. I hateful, you lot can, merely don't. End it. Put the mug downwardly.
Lansky Sharpeners recently contacted united states of america well-nigh their "Deluxe" sharpener setup, which is a v-rock guided rod style sharpener. This was serendipitous for me as I'd been looking for an alternative to my trusty Spyderco Sharpmaker and had actually been considering the Lansky setup, so an opportunity to review information technology seemed ideal.

If you're not familiar with Lansky, that'due south… somewhat surprising, considered they're responsible for the modern pocketknife sharpener "pattern" of guided rods as we know information technology. If you've used an Apex Edge Pro, a Wicked Edge, a KME, or whatsoever other ultra-loftier-finish sharpener you lot have Lansky to thank for the bones idea. The system was invented by the brand's namesake, Arthur Lansky Levine in the late seventy's.
The general concept is this: you lot take a prepare of stones (3 to five of them) of varying grits which you attach to rods. The rods pass through a number of marked slots on a two-sided clench, which y'all clench your knife into in a specific manner. The slot you pass the rod through sets the angle of the stone confronting the sharpened edge of the blade, creating an authentic border as you progress upwardly from low to high dust stones.
The "Deluxe" kit features 5 standard blazon stones, only Lansky makes a number of other kits every bit well equally sells individual stones for different needs – a leather stropping hone, diamond stones, curved stones for recurved blades, triangular stones for serrations, natural Arkansas stones, all in varying grits so you can tailor your setup to your needs and preferred technique.
Structure
The Lansky kit comes in a square plastic box with a snap closure on the front for utilize on the get, if you're then inclined. The kit includes the following: 5 stones (70 dust, 120 grit, 280 grit, 600 grit, 1000 dust), v separate stainless rods, the two sided clamp with the angle slots, a flat-headed securing screw for the clamp, and an actress pollex spiral for the rods. There's also a small bottle of Lansky'due south honing oil. The closure on the front of the box is a little difficult to connect, but to be honest I didn't find this an effect as I brought the kit to work and it's stayed there.
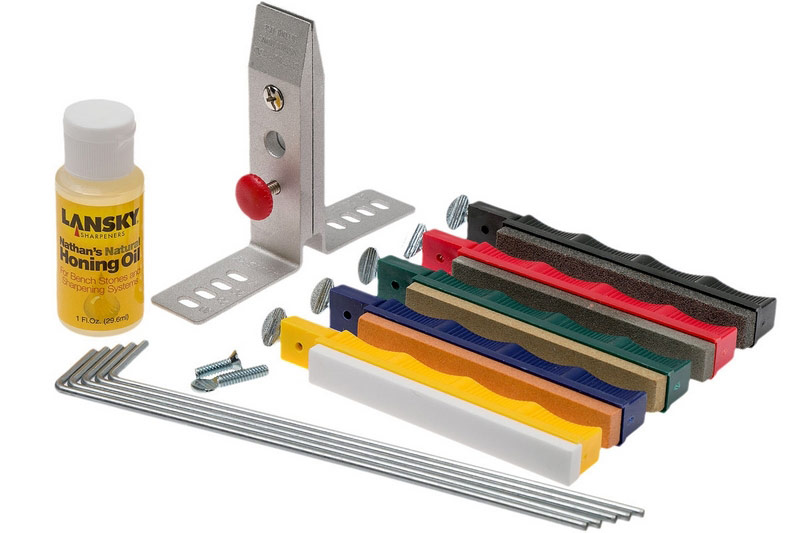
The stones themselves are embedded in the plastic handles and bonded (presumably with glue) in identify. The handles are dissimilar colors for the different grits – black for 70, red for 120, green for 280, bluish for 600, and yellow for k, helping you to chop-chop identify which stones are which at a glance. They all take a molded "compression grip" on the dorsum with 4 separate spots where you can pinch the handle between your pollex and forefinger to hold it. There's a threaded insert in the rear (in line with the stone) of each handle, and a vertical pass through which yous button the 90 degree upturned end of the rod through, then tighten downwards the thumb screw to secure it. Each stone/handle has its own defended rod, which is a nicety – you don't have to remove the rod and reattach it to a new stone each time.
The clench – which is the heart of the arrangement – has ii symmetrical sides both in an Fifty-shape. There is a thumb screw towards the rear, and a round headed Phillips screw towards the front, with a mounting hole for a stand in betwixt the two. The forward screw threads into the lesser one-half of the clamp, so it tightens the clamp on the blade, and the rearward (thumb screw) is threaded into the top half and pushes down into the bottom half, adjusting the angle of the clamp.
In that location is as well every bit a small square channel about ¼" deep towards the very tip of the clamp. There is a specific technique required to properly affixing the knife to the clamp – more in the adjacent section. Some people that accept used this setup accept complained that the rounded grip on the thumb spiral breaks, or that the threads for the forward screw will strip if you overtighten it – the sometime being replaceable, the latter requiring replacement of the clamp itself. I've sharpened many knives with the Lansky at this point and haven't had an issue. Time will tell.
Technique and Apply
First and foremost, if you don't ready this system up correct you will non get satisfactory results. Here's why: it'southward built around accurately putting a consequent angle on the edge of the knife, so annihilation y'all exercise that messes with that accuracy is going to accept a bad end consequence. To first, you accept to level the rods themselves and then level the rods with the stones before you tighten them down. Set up the rods long side down on a table and make sure they aren't bent or arced – a few of mine were. Straighten them out and then they're totally apartment on the table – I used a rubber mallet with a few light taps.
Adjacent, pass the brusk upturned cease of the rods through the vertical holes in the handles, and then the end of it is facing up – away from the stone. With the pollex screw still loose, set the stone and rod down on a apartment surface, and property the handle flat, press down on the pinnacle of the rod until both information technology and the stone are flat on the surface of the table. Then tighten the thumb screw downwardly as tight every bit y'all can (without using tools, to avoid stripping the insert.) This is so that y'all have a straight line between the rod and the stone. If you don't, your actual bending will non be the same equally the angle indicated on the clamp.
Next, you need to affix the blade into the clamp. Loosen the forrard screw almost all the way out. Then plow the rear thumb spiral all the way clockwise until it stops. Using a sharpie mark, mark the top of the handle pointing direct frontwards for reference, then turn the rear screw two full turns counter clockwise to approximately level the clamp out. Yous then want to insert the bract into the clamp, usually about 1/3 of the style depending on the meridian of the blade, and loosely tighten down the forepart screw. So turn the rear screw until it starts to feel tight, and tighten the front end screw all the way down. I use a chubby Phillips for this.
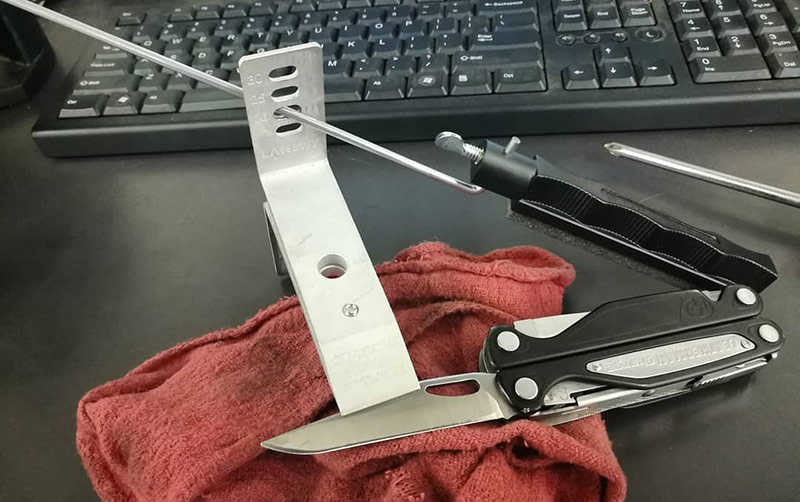
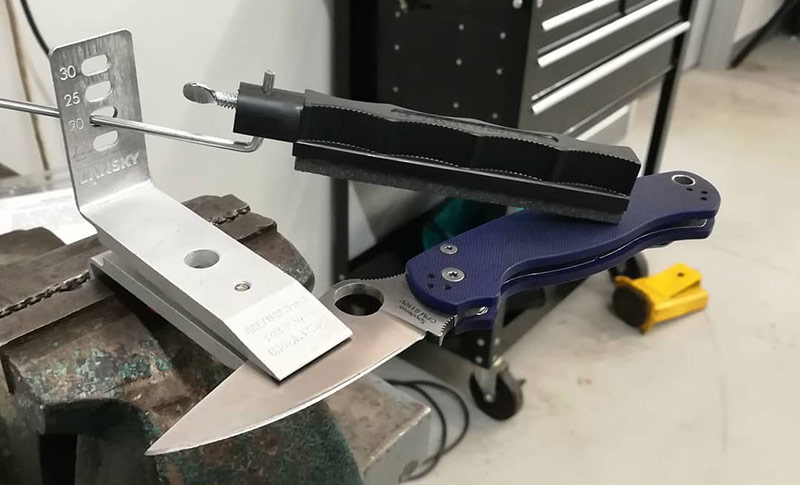
Brand sure that the rearward (angle adjusting) screw is resting in the small round indentation on the lesser one-half, otherwise the clench will sit down askew and your angles volition be off. Once you have it tight, make sure that the blade doesn't move in the clamp! Annotation: if yous're sharpening an uncommonly short bract, like the main blade on a Swiss Army knife, y'all should utilise the channel at the end of the clamp to go effectually the spine. This is to avoid the stone hit the tiptop of the clamp instead of the edge of the blade itself. Y'all want to exam for this when y'all're setting whatever blade up in the clamp, to make sure the rock isn't striking the clamp during whatsoever indicate in its travel. If it is, loosen the screw and slide the bract further out from the clamp and retry.
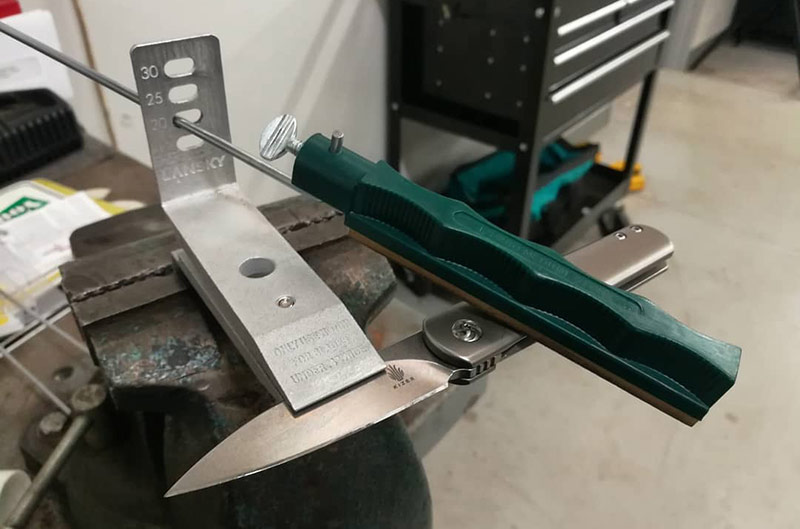
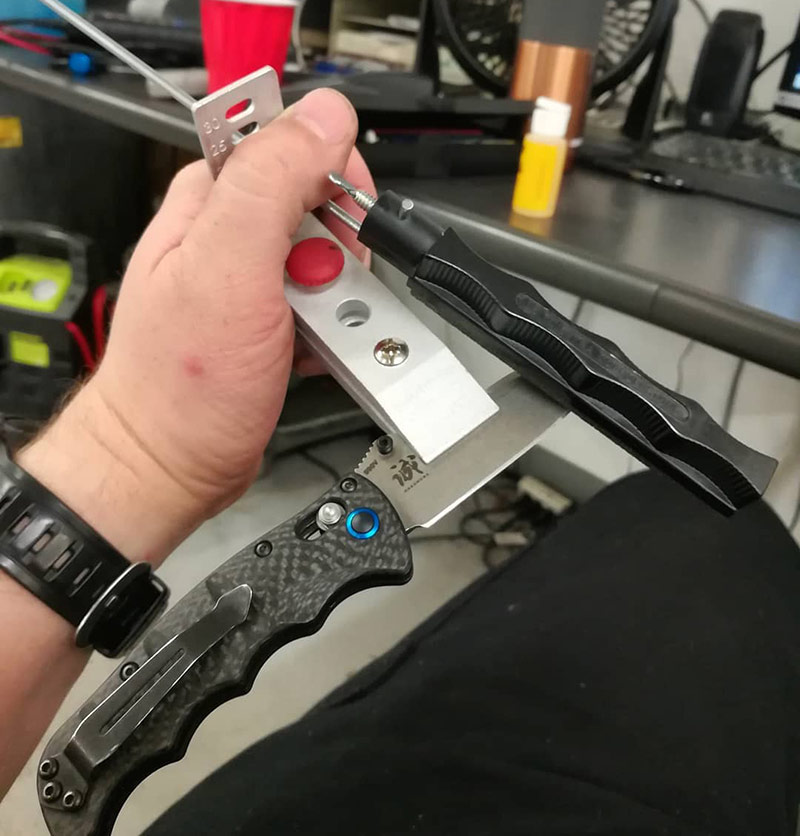
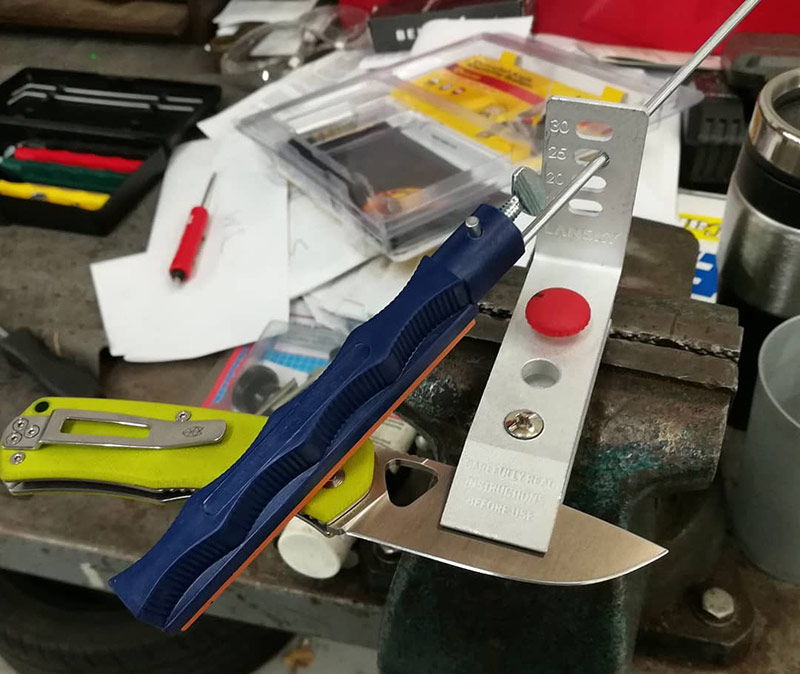
Now, y'all need to hold the clamp. Lansky says to hold the lesser of the clench in one hand, edge of the blade facing away from yous, and hold the handle with your other hand. I accept an adjustable vise at work which I find vastly preferable, I drop one side into the vise with the blade facing me and tighten it downwardly. At present y'all're gear up to offset.
If y'all need to actually re-profile the blade (the border is badly chipped, it's the wrong angle, etc) outset with the 70 grit ultra-coarse rock. You need to utilize the honing oil liberally to this guy, it's very porous and volition clog up rapidly. The standard technique is to start at the base of the bract with the dorsum finish of the stone (closest to the rod) and pull inward towards the blade as y'all sweep the stone out towards the tip of the knife, ideally ending up using the whole length of the rock equally you reach the tip. For longer blades, you can as well brand ii passes of the stone per pass on the blade to sharpen more quickly.
I've found that to save some time on the two lowest grit stones you can really sharpen in both directions to reprofile more chop-chop as well, then switch to one management on the higher grit stones to get a uniform scratch design. Use the black stone until you've achieved an fifty-fifty edge and developed a slight burr on the opposite side of the edge itself, which can take quite some time. Then flip the whole clamp over and repeat this process on the other side, ideally with an identical number of strokes to keep the grind even.
You echo this process with the ascending order of grit if you're starting "from scratch" – i.eastward. your blade is beat upwards, needs to have the border profile set, or information technology's the outset time you've sharpened it. If you have already sharpened that knife on the Lansky at your preferred angle, you can skip the black stone and sometimes you lot can even skip the red rock – although I notwithstanding showtime with the red stone on knives I've already sharpened. It's important to keep a thin layer of the honing oil on the stones – progressively less as y'all step up in grit, with but a tiny bit on the yellow ceramic 1000 grit stone – to avert bottleneck it with metal shavings.
Once you've achieved an even edge with a slight burr opposite, flip sides, repeat, and so move to the next higher stone. After yous've got a pretty polished edge with the 1000 grit stone, I recommend stropping the border of the blade to clean it upward, and you're good to go. I always examination sharpness on paper – if you tin can cut an "Southward" shape through printer paper, information technology'south properly sharp. Yous can as well see if it will shave arm pilus just that's gross and your spouse won't similar it.
A few things to note here. It'southward of import to avoid sharpening past the cease of the tip repeatedly, every bit this can lead to the rock rolling off the stop and rounding the tip, which is a bummer. Y'all should periodically make clean the stones to get the built up metal shavings out of them – I utilise mild soap and warm water, and dry thoroughly before reapplying the honing oil. Throughout the sharpening, try to make certain that the rod hasn't go misaligned with the handle/rock. You can also mark the edge of the blade with a sharpie to brand sure you're sharpening the entirety of it before y'all move to the side by side step – mainly useful in the early low grit stage and when reprofiling.
Another trick – with the clamp mounted in a vice, residuum your index finger on the paw you're non holding the handle with on acme of the rod behind the clamp – this prevents the rod from bouncing up and down as you're working it, keep the angle consequent. I'd like to thank Mike Rixman (@mrixman on Instagram) for sharing the Lansky Manifesto with me early on, which helped a lot with my sharpening technique.
Results
If y'all're sharpening a "normal steel" – like 440C, 154CM, VG-10, 8Cr13MoV, CTS-BD1, 1.4116, that sort of matter – this kit works great. You can reprofile a softer stainless steel with the standard alumina oxide lxx grit stone in a couple of minutes, which works great for your standard "coworker heard you acuminate knives" types of situations – I was able to reprofile and and then achieve an absolutely ridiculous edge on a coworker's Kershaw Link in 420HC pretty quickly, and this setup also worked slap-up on the James Make Folsom in BD1.
The Lansky sharpener'southward clamp has four slots on each side in different degrees: 30, 25, 20, and 17. 30 is primarily for large, broad things similar axes. Lansky says that 25 is for pocket knives, 20 is for kitchen knives and 17 is for razors and scalpels, but I've found that a 25 caste edge is but as well obtuse on a pocket knife for the blazon of cutting I similar to practice. I cease up using the 20 degree slot for near pocket knives, sometimes stepping down to the 17 for Swiss Regular army knives – sure, information technology'll ringlet easier than 20, merely it's extremely like shooting fish in a barrel to resharpen and fits the scalpel nature of those blades well. In that location'south always going to exist a tradeoff between sharpening angle and border stability – higher angle is less abrupt and more than stable and vice versa.
What information technology only doesn't work very well on is mod super-steels (yep we know that's a loose term but you get the idea). Certain, it will do them. You will just be there all day. S35VN is a real drag (no pun intended) re-profiling, fifty-fifty with the super coarse rock. I simply gave up and admitted defeat on one of my CPM S110V Spyderco's, information technology wasn't going to happen in my lifetime. Your hand would literally fall off before you put a sharp edge on Maxamet or CPM REX 121. For these super steels, you lot're going to want the diamond rods (come across the side by side section) or to suck it up and ship it off to a professional. Only being honest.
Mastering the Lansky is actually all about technique and persistence; you've got to exist consistent and patient when y'all're setting the initial angle, once you get beyond that information technology's pretty smooth sailing.
Recommended Extras
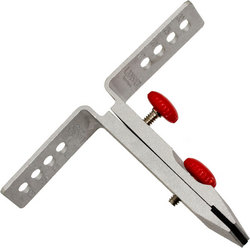
 The Lansky Deluxe sharpening kit works fairly well as it comes, but there are a number of other things Lansky sells that will brand things easier. Kickoff and foremost, if yous don't have a vise fastened to a desk-bound to anchor the clamp in, you lot're really going to desire to invest in the Super "C" Clamp. This will clamp to the edge of a desk-bound – or a vertical surface – and has a moveable peg that yous tin can set the angled clamp onto, fitting into a hole on the clench in between the main screw and the pollex screw. When it's fourth dimension to switch sides, merely lift the clamp off the peg, flip it over and place information technology the other way – simple! There are also 2 other mounts – a universal mount that can be permanently attached to a table, equally well as a pedestal mount with a flat bottom.
Another thing to consider, if yous're working on knives that have polished surfaces or an easily scratched blanket, is the Soft-Grip Clench which has a padded section at the end to preclude scratches, well as using dual thumb screws to conform and tighten.
 Finally, in that location are loads of extra stones available, likewise as a slick leather strop mounted in the aforementioned style plastic handle, and a Super Sapphire finishing rock (2000 dust, only sold separately.) If you lot're doing sharpening on high cease knives with modern steel you might desire to choice upwards the 3 stone or 4 stone Diamond Kits, which come with another bottle of honing oil even though you're non supposed to use it. They're pricey at $85 and $100 MSRP respectively, but bluntly information technology beats the alternative of simply not being able to sharpen modern steels in a reasonable time frame, and they're still much cheaper than some fancier alternatives (come across below.) You can likewise buy the diamond stones individually – in Actress Coarse (70 dust), Coarse (120), Medium (280), and Fine (600). There are also curved stones in a diversity of grits for recurves, and triangular stones in a multifariousness of grits for serrations.
Alternatives
All these knives bachelor at BladeHQ.
Before I received the Lansky, I'd been sharpening for years on the Spyderco Tri-Angle Sharpmaker (BladeHQ | Amazon) , which is sort of your standard "knife guy sharpening kit" and while they're actually dissimilar products, I think the performance yous get from the Lansky is much higher for less coin than the Spyderco kit, which retails for effectually $60 at time of writing. The Sharpmaker is more of a strop and less of a sharpener, able to refine an edge that's the right profile but merely wearisome.
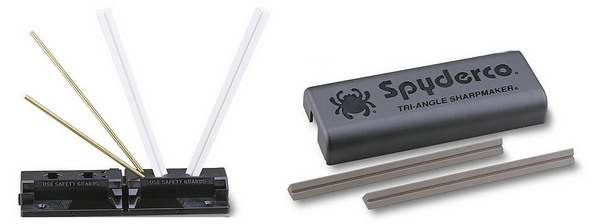
Information technology'south much less tedious to set up – literally, you lot just open the box, slap the stones in the angle you desire, put the lid on the other side of the handle, stick the guard rods in and yous're good to get – merely you merely can't do the kind of reprofiling and stock removal that you can with the Lansky on the Sharpmaker. It comes with 2 sets of stones – regular and fine – in a triangular shape that y'all switch between the corners and the flats as you progress upwards. It's a proficient travel kit, if you're the type of person that travels with a knife sharpener (?)
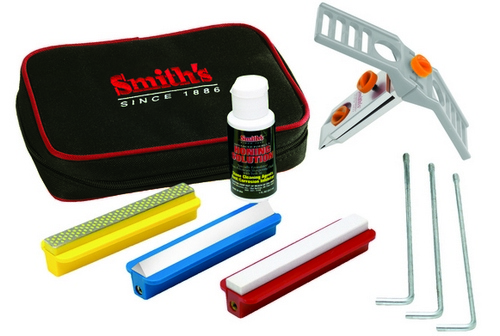
Smith's also makes a very similar guided rod setup (with fixed angles on a two piece clamp) in a variety of kits with different stones, like this one, and they're all cheaper than the equivalent Lansky kit. Caveat Emptor: yous get what you pay for in my experience, the Smith's sharpeners aren't every bit dainty as the Lansky. Personal opinion at that place.
There are, of course, much more high-end sharpening setups that are based on the same basic principle of the Lansky. One of the more than popular ones right at present is the KME Sharpener (BladeHQ). Information technology has a sliding channel to set the verbal angle you want (versus the ready angles of the Lansky) and the rod passes through a spherical bushing to entirely eliminate any play and resulting inconsistency in your angles. The standard kit comes with 4 stones ranging from 140 up to 1500 grit, and has a slick wooden pistol-grip handle. Of course, it's about four times the MSRP of the Lansky, at a $170 MSRP.
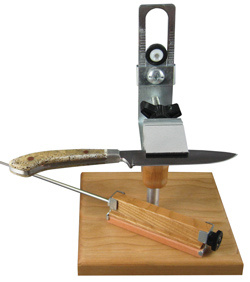
Want to become totally insane? Check out the Wicked Edge Generation three kit (BladeHQ). The pocketknife sits edge upwards, perpendicular to the table, in a vertical clamp. Two guided rods on heim joints are set with an ultra-precise punch to the exact angle you lot want, and you lot swipe them beyond the border ane subsequently another in echo. The Pro version comes with 6 pairs of stones (12 total) in grits from 100 up to 1000 to go from junk to mirrored edge. All yours for only $899, or nearly 22 times the toll of the Lansky. It but makes sense if you're annoying wealthy or you're doing it professionally.
Wrap-Up
The Lansky Deluxe sharpener kit should really exist your first stride on your sharpening journeying, so to speak. It's only 40 bucks, so if you decide y'all hate sharpening and are but gonna apply your warranty sharpening service, you're not out a ton of money. Information technology also does "regular" knives extremely well. You can put a screaming abrupt border on a standard Swiss Regular army blade with this thing with very niggling do or fourth dimension. It's well designed, The states Made, practical and affordable. Every bit a knife person it'due south a no-brainer.
![]()
Merely if your detail definition of fun is putting a hair popping mirror border on M390, this isn't going to exercise information technology. The standard stones aren't annoying enough and this organisation isn't accurate plenty. Sure, you can purchase the four Diamond stones ($20 each) and the Super Sapphire and Stropping hones ($20, $14) forth with the C-Clench ($20) and the soft grip clamp ($13) and ii packs of four additional guide rods ($4) and you would have a pretty cracking sharpening kit for modern steels. Simply yous'd be into that setup for nearly $190, and you lot could take but bought a KME for less and got some extras. It depends on how far down the rabbit hole you desire to go. But for the standard price of this kit, information technology works great on your regular pocket knives, much improve than the l% more expensive Sharpmaker does.
- Affordable, guided rods give reliable angle command, volition put a scary sharp border on most normal knives, lots of accessories available, and brought the modernistic knife sharpener into existence.
- Accuracy depends on technique, rods become loose, can merely choose from set angles, will not sharpen modern super steels, accessories all toll quite a bit relative to cost of kit, one time you become good with this you're bound to spend a fortune on knife sharpening stuff.
Quality/Performance - 83%
Value for Money - 89%
86%
If yous're just looking to put a good edge on some normal knives, stop here. If y'all're looking to put a "slice through a phonebook" edge on CPM Rex 121, look elsewhere.
Source: https://knifeinformer.com/lansky-deluxe-sharpening-kit-review/
0 Response to "How To Use Lansky Knife Sharpener"
Post a Comment